Schedule by email plugin
The Schedule by email plugin must be configured to be able to use the Schedule by email data source.
This configuration is only needed for on premise installations. For cloud service, please see Schedule by email.
Requirements
- A shared mailbox in Microsoft 365
- Plus addressing enabled in Exchange Online
- An app registration in Azure AD to provide access to the mailbox
Optional
- An application access policy in Exchange Online to limit which mailboxes the app has permission to (security recommendation)
Enable plus addressing
This will affect the entire organization, not just the shared mailbox. Please read the link below for information about what it means and how it's enabled.
Create a shared mailbox
We recommend using a dedicated mailbox for the purpose. Please refer to Microsoft's documentation on how to create one.
Register an app to access the shared mailbox
Microsoft 365/Azure AD administrator access required
-
Go to https://aad.portal.azure.com/ and login with an admin user
-
Click Azure Active Directory
-
Click App registrations
-
Click New registration
-
Enter a suitable name for the app. for example "Smartsign - Schedule by email" and select Accounts in this organizational directory under Support account types. Complete the task by clicking Register.

-
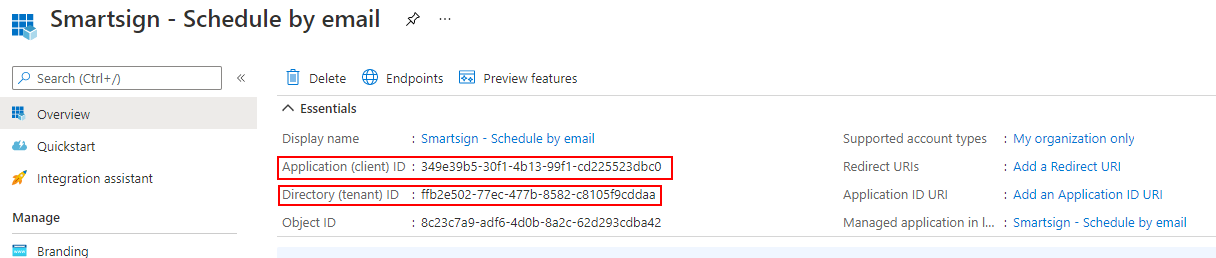
The app will now be created. Please make a note of the Application (client) ID and Directory (tenant) ID. You will need them later.
-
Click Certificates & secrets
-
Click New client secret
-
Give the secret a description and select when it should expire (typically never).
-
The secret will be created and shown below Client secrets.
IMPORTANT! Make a note of the secret right away. You will not be able to access it again. -
Click API permissions
-
Click Add a permission
-
Select Microsoft Graph
-
Select Application permissions
-
You can type in the search field to find permissions. You'll need to add the following permissions.
Permission Used for Mail.read Reading email from the shared mailbox 
Check each permission and click Add permission to add them. -
With the permissions added, click Grant admin consent for <your company> and then confirm.


-
Verify all permissions are green.
-
Done!
Create an application access policy for increased security (optional)
In order to limit the app you have registered to specific mailboxes, an application access policy must be created in Exchange Online. Please see Microsoft's instructions on the link below.
https://docs.microsoft.com/en-us/graph/auth-limit-mailbox-access
Configure the plugin
-
Login to Smartsign Publisher as an admin
-
If you have more than one site, go to the root site
-
In the menu, go to Management → System → Services
-
Find your server and click View
-
Click the Plugins tab
-
Click View on the Schedule By Email plugin
-
If you have more than one site and want to be able to create Schedule by Email data sources in other sites than the root site, enable the setting Available to all sites on the Info tab of the plugin.
-
Click the Settings tab
-
Enter the information you have prepared in the previous sections
Setting Description Example Shared mailbox name Input the name of the shared mailbox in Microsoft 365, only the part before '@' publish Shared mailbox folder name Optional, input the name of a specific folder to check for emails. Inbox will be used if left empty ToSmartsign Organization domain Input the email domain, this must match the domain of the shared mailbox used example.com Tenant ID Input the Tenant ID of your Microsoft 365 tenant ffb2e502-77ec-477b-8582-c8105f9cddaa Application ID Input the Application (client) ID of the application you have registered in your Azure AD. 349e395b5-30f1-4b13-99f1-cd225523dbc0 Secret Input the client secret of the application you have registered in your Azure AD. n_0.WSRXX1VjFxtUSVjFxtUS.9-618.DlkE -
Click Save in the action bar
-
Done, you now can create Schedule by Email data sources